Posts

Showing posts with the label Hibiscus

Hibiscus Study....it just keeps getting better...

Image
It seems I can't knit anything else while in the middle of a KAL....so while I'm waiting for clue 4..... I was playing with my set focus "portrait" lens.....well, they are portraits of my Hibiscus, which I love (and photograph) every single time it blooms.

A sure sign of Spring...

Image
Although we were fooled into thinking that Spring was here a couple of weeks ago with the wonderful weather, it turned cool, no... well downright cold for a few days, but there is one true sign of Spring around this house... My Hibiscus is blooming.....in the corner of the kitchen, close to the back door....I'm thinking that it liked the relatively mild winter we had and decided to celebrate the imminent arrival of Spring.  I've taken so many photos of this plant....I never tire of the just plain gorgeousness of the blooms. I've been knitting away on my Color Affection .....not paranoid have to knit it style, but slowly, luxuriously enjoying the whole thing style.  I love this Madeline Tosh Merino Light yarn....and the colours are sublime!  The first two sections are complete - done in Manor, with Mica as the first contrasting shade.  Now I get to add in the third shade (Onyx) and do all of those lovely short rows.  (This photograph is intriguing me - how there...

Hibiscus Cardi updates....

Image
Hi Anne:  You don't know me, but I love your patterns.  At the beginning of the year, I tackled your Fair Isle Hibiscus, and I love it.  I completed it for a dog show in Alaska in March.  I show Cairn Terriers, and I was working hard to make sure that my baby girl, Ivy, would finish her championship with me in your sweater.  It worked -- I'm wearing the sweater in Ivy's championship photo!   Then I entered it in our local County Fair (this week), and it took Best in Show of the handknitted adult sweaters.  Wow!  I'm so proud and wanted to thank you for the lovely pattern and the lovely challenge.  It was my firs attempt at steeks!! Have a great day! Heidi http://heidishandmadehappiness.blogspot.com/ Then, from LiisaB via Ravelry.... Wanted you to know that your lovely Hibiscus Cardigan pattern earned me a Grand Champion AND a Best of Show Ribbon at the Montgomery County Fair this weekend. The judges were gobsmacked and immed. came to Rav to f...

Hibiscus - Applöse

Image
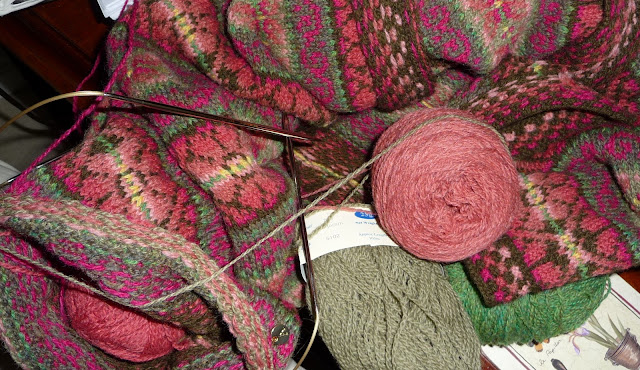
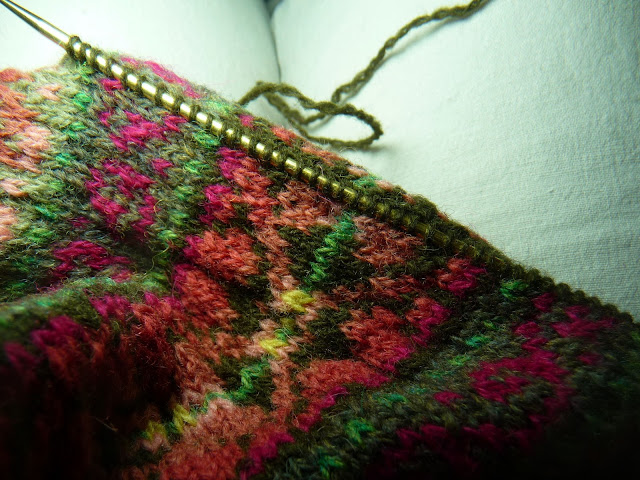
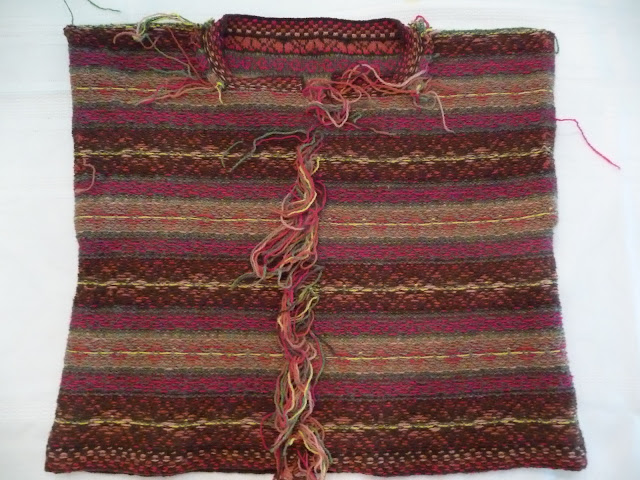
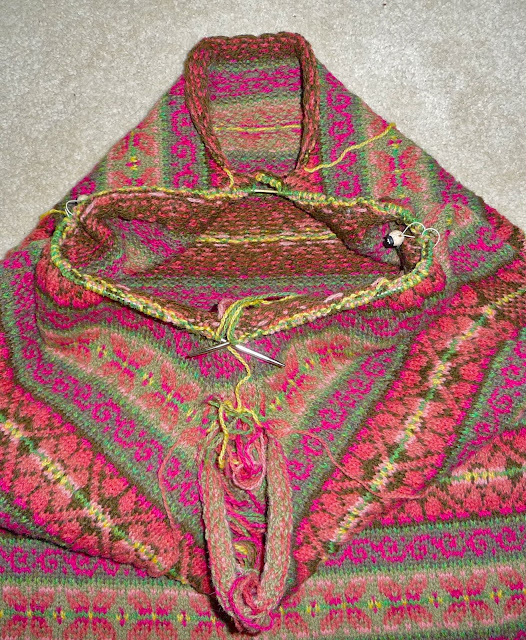
I read Attic 24 - a fabulous, colourful, fun blog mainly about crochet.  Lucy, the blogger, has these "Ta Da" posts - when she finishes something and shows it off. When you spend a bit of time, or a lot of time, creatively....you've put effort into something that you are doing just for fun...this should be celebrated.  Like other knitters, I've tended to diminish the wonder that is knitting.....you start off with some string, and you use some sticks, and with manipulation you end up with WOW - I made that! So in the spirit of all things Shetland, I'm instigating the "Applöse" post........from the Shetland Dictionary.... Applöse - (v) offer; make available; make known. So from now on, finished projects will be made known, Applösed, where I share with you my utter joy in a completed project. So here it is......my Hibiscus Cardigan Applöse moment....... Hibiscus - 9 rows longer, the sleeves are significantly longer but still 3/4 length - buttoned up - I lo...

Buttons - always a conundrum !

Image
First it was buttons on the right, loops on the left -  but somehow that didn't feel right -- off to check the closet - oh no!   Buttons on the left, loops on the right.....ah, that's much better! Buttons courtesy of Carolyn at Main St. Yarns - my LYS - she has the best taste in buttons and can pick out just the right one every time!

Hibiscus - it's still blooming!

Image
Here it is, (still Sat. Sept. 4) - a cold blustery day - and my Hibiscus has 6 blooms and about 4 more buds ready to bloom.....it has been encouraging me all through the knitting of my Hibiscus Cardigan. My next choice will be no buttons, one button (as shown on the pattern), or buttons up the front. 

Hibiscus - bath time

Image
Then it was time for a bath in Eucalan - I used the Grapefruit scented one this time. Then onto the Wooly Board - or Jumper Board - drying time is less than 24 hours for me when I use my Wooly Board -- the frame itself gives a 1" space between layers of the sweater -- so air circulates and dries so much quicker.  It was a windy dull day here this past Saturday so I put it out on the deck, under the awning and it was pretty much dry in a couple of hours.  I left it over night to ensure that it was completely dry the next day.

Hibiscus - underarm seam

Image
Tidying up your ends as you go lets you see how nice your underarm sleeve seam is......

Hibiscus - casting off!

Image
Literally just cast off the 2nd sleeve...about 1:00 pm Saturday, Sept. 4

Serious Knitting and Exercise going on here...

Image
Thought I'd run out of Cinnamon there for a while -- me...run out of yarn ???? Serious exercise required new snazzy runners - DH got a pair too -- his aren't this beautiful watermelon shade though LOL!  You should see the inside sole liners - very groovy!

The Sleeve...

Image
Sleeve Charting (playing with colour saturation on this photo) So I've cut my sleeve steeks and tried my sweater on.....looking at it with a fresh eye as now it is actually on my person. I did make it a little longer...and I'm looking at where the sleeve will hit my arm because to correspond with where the pattern falls on the body, where it meets under the armhole, and having to make the sleeve end with the main pattern and the garter stitch band, well, it's just a little longer than it should be or a little shorter than it should be........it's just not right. A decision must be made! I've decided to go for full length sleeves.....so I copied the chart, stuck it together, counted the stitches that I've picked up around the armhole opening for the sleeve, figured out how many rows it takes, decreasing every 4 rows.....a few decreases right away at the underarm......and marked up the chart with each decrease.....and we're ready to go. Lorraine calls this sl...

The bands.....

Image
When knitting your bands - yes it's a bit tedious moving the working yarn from one side to the other -- it's important here to keep the yarn floating behind the stitches firm - again, moderation is the key - not too tight, nor too loose.....it's worth taking your time to get nice front cardigan bands that don't pull or sag.  I started each row with an Olive stitch -- so that at the top and bottom of the band, to give that finished look where the bands meet. The finished band should lie flat - no flaring or pulling..... I started each row with an Olive stitch -- so that at the top and bottom of the band, to give that finished look where the bands meet. At this point I like to tidy up any ends hanging - all of those ends on the bands, and tidy up the steek edges - the neckline steeks and the front band steeks.  Once this is done, you're ready for the sleeves. I like to finish off the steek edges at this point. Happy Knitting

Front Cardi Bands

Image
When putting a cardigan front band on your sweater, the most important thing is to pick up a stitch for each and every row.....it makes for a lovely pickup edge... Stitches - knit up in the "ditch" between the edge steek stitch and the body.... BUT, you must use a needle size small enough that the finished band is neither too tight, or too loose -- it's sort of a Goldilocks thing...it has to be JUST RIGHT! I find that if I use a needle 2 or maybe 3 sizes smaller than what I used on the body, I'm right on target -- this is a personal thing and you'll have to play with this until you get it just right. Pick up the stitches on both front edges... When you pick up the stitches on both edges - count them - double check how many you have on each side.  I made my sweater longer - so I had 156 stitches on one side and 157 on the other -- easy to 2tog to get rid of that extra stitch on the second Olive row that makes the Olive garter row......what you want is an even numbe...

Hibiscus Neckline......

Image
Done in checkerboard garter stitch -- that's two colours per row - one row of k2 A, K2 B and repeat and a second row, knitting back, using the same shades, to make little garter stitch blocks.  You change up shades as necessary and it makes for quite an effective border. I did on this sweater a garter stitch row in Olive before starting the checkerboard. The pattern is written for this -- but  I obviously got something wrong.....but what I was trying to do was start and end each row of this checkerboard garter stitch edging with a stitch in Olive.....so when you pick up for the neckline band, do your garter stitch checkerboard starting off and finishing with one stitch in Olive. That way you have a one stitch garter row of Olive on the front edges of the neck band. This Olive row, acts as an extension of the steek edge row from the body of the sweater.....so that when you are picking up stitches for the front cardigan bands, you can carry right on up through the garter stitch ...

I forgot to show you...

Image
I forgot to show you what the steek looks like on the inside - before cutting.  Yes you could trim these off first, but I like to give the ends a little tug, snugging up the stitches - on the right side where the yarns start/stop on each round - snugging them makes a little break "line" on the steek -- makes it really easy to cut.

Hibiscus steek

DH & I had great fun pretending to be film makers..........I was doing the directing, with him behind the camera....... I used to have tips and techniques on my web page (sequential photos) and I'm going to rework this information into videos - stay tuned.....if you need me, I'll be in the editing room! Happy Knitting,

Hibiscus Update - the body is complete!

Image
Hibiscus body, on a 24" circular - viewed front to back you can see the steeks and the neckline opening pouches. The last round at the shoulder line is the centre row of the main motif - and on this round I cast off the 8 steek stitches, leaving the two edge stitches of each steek live. Here's I've put the front/back stitches on separate needles - again, you can see the neckline stitches on their holding yarn - big pouches of stitches. So the shoulder "seam" will be the centre row of the large motif - I lengthened my Hibiscus as I am tall, and worked it so that this is where the shoulder seam would fall.

Hibiscus Cardigan......armhole steeks

Image
I've reached the armhole steeks -- the steek is marked here with my little sheep stitch markers. You can see that I am multi-tasking -- reading the third Percy Jackson book when I take a break from my knitting. One thing I have to say here -- I'm usually not a big fan of charts done in colour -- but kudos to Simply Shetland -- this chart is big, the colours are easily distinguished from each other -- I can read it easily while I'm knitting......thank you Simply Shetland for a terrific job in the printing of this pattern. It's Sunday - it's hot - I've spent the morning outside but it's time for a break. The Queen's Plate race is on TV - HRH Queen Elizabeth and hubby are here visiting Canada and will be there -- so I am going to sit down with my knitting, watch the parade of hats and yes, watch the race LOL! Check out Deb's Hibiscus Cardigan at her blog - she's finished~ yeah for Deb! Happy Knitting

You can knit it as long as you want to......edited June 26

Image
Rebecca has left a new comment on your post " Customizing your Hibiscus Cardigan...... ": So glad you posted this because this was the very reason I was hesitant about the pattern. The pattern is gorgeous but I just didn't think it would look right on my body type....... hmmmmm .....off to ponder this some. I REALLY love this pattern! like my new tape measure? It's a V&A tape measure purchased at Shall We Knit in New Hamburg.......love it! It's really good to use a metal tape measure because metal never stretches....... So both Ellen and Rebecca want to knit their Hibiscus cardigan longer.......with your swatch and a few calculations this should be easy..... Ellen indicated to me that she wanted to make her sweater about 3" longer......... NOTE: As I do not intend to give specifics here of the pattern instruction, you may not totally understand the following -- you might need to have the pattern in front of you to relate to. I'm not sure as I...

Customizing your Hibiscus Cardigan......

Ellen wrote..... Hi Anne,   Thank you for directing me to your blog! I am excited about your knit-along... I am planning to knit the beautiful Hibiscus cardigan you designed and will read all the detailed blog entries with great interest!! I am in love with the fair isle pattern and the colors, but I was hoping to knit it in a longer length as short jackets don't look good on me. I might also want to make the sleeves a little longer. Would it be possible to add one more strip of the design to the bottom after knitting the edging? Any input you can give me would be SO appreciated! Do you know how much more yarn would be required for the extra strip? Thanks so much, Ellen   Hi Ellen! Of course you can do anything you want to your Hibiscus cardigan -- make it longer, lengthen the sleeves, whatever -- but it all starts with a swatch.  Are you getting gauge both stitches and rows required?  You have to start with your gauge before you can calculate any adjustments you nee...