Following "the straight and narrow" in Stranded Knitting!
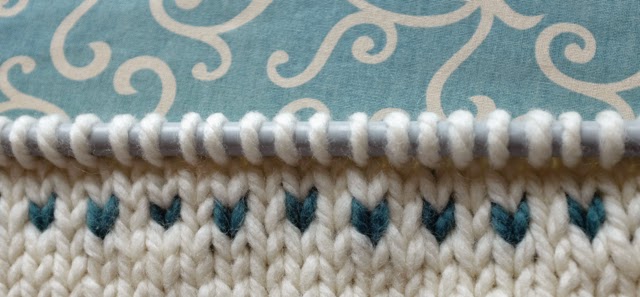 |
| Look at this simple row of turquoise stranded stitches....they look a bit topsy-turvey, a bit wonky, some are up, some are down..... Let me help you get your stranding on the "straight and narrow"! |
When I say "the straight and narrow", I am talking about the position of your background and pattern yarns. Some stranded knitters call this yarn dominance....but yarn is very docile, it follows you wherever you ask it to go! Look at this example of two rows of simple stranded knitting - this photo of the "back side" shows you perfectly what I am referring to....the pink is going along it's "straight and narrow" path...while that red, hmmm, it does a little turn and switches position half way across the row. Did it do that on it's own? NO! It just did what the knitter told it to!
 |
| To keep things simple here, I have used the cream yarn as the background, and a variety of colours for the pattern stitches in my photos! The yarn used is Rowan's Big Wool....it is the perfect wool to demonstrate with here! |
 |
| let's look at that again..... the Lilac yarn is being stranded UNDER the cream the Pink is being stranded OVER the background white stitches the Red stitches (looking from the right to left) start off being stranded from under, then switch position and are stranded OVER the cream stitches! By now you are probably wondering... DOES THIS MATTER? Well apparently, it does! |
 |
| In this sample....the yellow and turquoise are stranded from below, while the green stitches are stranded from above! See how the yellow and turquoise stitches sort of connect with each other? They are taller than the cream stitches in their rows of knitting. The green stitches are actually ever so slightly smaller than the cream stitches in their rows, and the motif isn't as distinct as it appears in the turquoise and yellow! When you look at the back side of your stranded knitting, you can see what position your stranding yarns are in....if you look closely! |
 |
| I re-knit this swatch, using orange instead of turquoise this time.... you can see the difference in the green motif from the swatch above! |
 |
| This is a simple way of looking how the two strands travel along a row of kitting...... when your pattern stitches come from below.....you can see how they would be taller! |
How to set yourself up to knit
on "the straight and narrow"...
on "the straight and narrow"...
 |
| I knit primarily with my right hand - I am "a thrower" or an English style knitter ....it doesn't matter what you call it.... holding both shades with my right hand, knitting as normal with the background shade, always bringing the pattern shadeup from underneath, knit the pattern stitch and let it fall back down, you never twist your yarns in stranded knitting! |
 |
| Continental knitters hold both yarns in their left hand ....the background shade is over your index finger, and your pattern shade always comes from below... no twisting here! |
 |
| Another great way to knit stranded, is to combine both techniques! hold the background shade in your right hand, stranding above and the pattern shade in your left, stranding below maintaining their positions throughout! |

So it's easy...it doesn't matter whether you hold your yarns both in the right hand, both in the left hand, or one shade in each hand...what IS important is that the yarn being used for the pattern stitches always travels along below...popping up when required!
If you keep your stranding position throughout your knitting, you won't get yourself all tangled up!
After all, when you take the trouble to knit a stranded motif, you want it to stand out! While I have used a Super Chunky weight Big Wool here for demonstration purposes...most stranded knit patterns use finer yarns, and keeping on "the straight and narrow" is very important no matter what weight of yarn you are stranding with!

I hope that this helps you even just a tiny big with your stranded knitting!
Happy Knitting,
Anne

Here's a tip from Daisy!
You have to be able to read your charts easily. What stitches represent the pattern and what stitches represent the background....sometimes it is hard to "see" on a complicated chart.
Please read the Tips and Techniques post Charts on how to make your charts easier to read!
www.deramores.com/blog-awards:
This blog entry is my submission to the Deramores Blog Awards 2014.
Deramores is the UK’s number one online retailer of knitting and crochet supplies.
This blog entry is my submission to the Deramores Blog Awards 2014.
Deramores is the UK’s number one online retailer of knitting and crochet supplies.


Best explanation of the logic underlying stranded knitting that I've ever seen! Thanks!
ReplyDeleteThank you Linda!
DeleteThank you, this makes is look so much simpler: I had sort of given up on stranded knitting because mine didn't look good at all, no wonder, I was always twisting the yarns. Now I can try again!
ReplyDeleteSophie, I am so happy to hear that this post inspired you to try stranded knitting again! I must warn you that it can be addictive😃
DeleteOh my goodness you just changed my knitting life. I was always disappointed in my stranded knitting because it never, ever looked like the picture and I now realize that I was just being haphazard with my floats. I knew to keep them loose but never that there was a "straight and narrow path" they had to be on. Hurray! Thank you soooo much.
ReplyDeleteHi Jillabeena! Yeah! I am happy is this helped even a tiny bit with your stranded knitting!
ReplyDeleteI have never tried knitting with two different coloured yarns. The effect created looks so good. I shall have to experiment. Sarah x
ReplyDeleteHi Sarah, Try it, you might like it!
Delete